Search This Blog

Sunday, 14 August 2016

WebLogic HttpClusterServlet Proxy Server


Hi All in this document we are going to use WebLogic HttpClusterServlet application as a WebLogic WebServer. we don’t want to install a separate WebServer like (Apache,IIS, OHS, IHS or IPlanate) rather we want to configure and run a WebLogic Server itself as a WebLogic WebServer. Below are the steps included.

1. Ready with Weblogic Domain with 1-AdminServer and 3 Managed Servers.
2. Develop Simple HttpClusterServletWebApplication (DemoProxyWebApp)
3. Deploy the Application “DemoProxyWebApp” on Managed server
4. Deploy Benefits.jar application on Webcluster.
5. Validate The complete architect flow

Architecture Diagram:


Step 1: Create a WebLogic Domain with 1-AdminServer and 3 Managed Servers…And a Cluster like following.
WebLogic Domain: demo2domain Cluster : MS1 and MS3 managed servers are part of web cluster in with we need to deploy business applications (benefits.war). Web server : MS5 managed server act like as front end web server in which we deploy the application “DemoProxyWebApp”
Cluster - Web Proxy server on same WebLogic Domain


 Step 2: We are going to develop a Simple HttpClusterServletWebApplication to make the “FrontEnd_MS”(MS5) Server as a WebServer.


2.1. Create a Directory somewhere in your file system like following:
oracle@mydev:/u01/app/software$ pwd
/u01/app/software
oracle@mydev:/u01/app/software$ mkdir DemoProxyWebApp

2.2. Create a “WEB-INF” directory inside “DemoProxyWebApp” and then place the following “web.xml” file inside “DemoProxyWebAppWEB-INF”
oracle@mydev:/u01/app/software/DemoProxyWebApp$ pwd
/u01/app/software/DemoProxyWebApp
oracle@mydev:/u01/app/software/DemoProxyWebApp$ mkdir WEB-INF

web.xml: ( Modify Cluster address penciled in yellow mark below according to your environment) 7001 and 7003 are listener ports for MS1 and MS3 managed servers.


HttpClusterServlet
weblogic.servlet.proxy.HttpClusterServlet

webcluster
192.168.33.100:7001|192.168.33.100:7003


verbose
true


DebugConfigInfo
ON


HttpClusterServlet
/


HttpClusterServlet
*.jsp


HttpClusterServlet
*.htm


HttpClusterServlet
*.html


2.3. Now create a Simple “weblogic.xml” file inside “DemoProxyWebApp/WEB-INF” like following: weblogic.xml :

/

Step3: Now deploy the Application “DemoProxyWebApp” on “FrontEnd_MS” i.e MS5 WebLogic Server to make it as a WebServer…to redirect Client request to Cluster Members.

Once deployment finished make sure application is in “Active” State on on “FrontEnd_MS” i.e MS5.
Step 4: Now deploy the Application “benefits.war” on web cluster (MS1 and MS3 managed servers are part of web cluster) Download “benefits.war” from link Download benefits.zip Deploy the benefits.war on the web cluster. Test the benefits application with below URLs.

Managed server MS1 URL :- http://192.168.33.100:7001/welcome.html
Managed server MS3 URL :- http://192.168.33.100:7003/welcome.html

Validating the Proxy setup

 Step 5: - Test the same application access from Proxy server ( “FrontEnd_MS”(MS5) Server as WebServer.) which is running on listing on port 7005

URL : http://192.168.33.100:7005/welcome.html

The application accessed with the HTTPClusterServlet (Proxy Web server)
Validating the Web Proxy using HTTPClusterServlet

Saturday, 16 July 2016

Control Admin Server Using Node Manager and WLST


Control AdminServer with Node manager in WLST


Hey all, here we are going to know about the start and stop of admin server with node manager nm commands using WLST.


Controlling WebLogic Servers with Node Manager using WLST
 Here are the brief steps we are going to follow.

1.    Start Node manager        -  startNodeManager()
2.  Connect to node manger   - nmConnect()
3.Connect and Enroll to admin server    - connect() ,nmEnroll()
4.Start and Stop admin server            - nmStart(),nmKill()
        -


Step 1: Start Node Manager

Start Node Manager using below command. Provide the argument values from nodemanager.properties” file under node manger home
wls:/offline> startNodeManager(verbose='true', NodeManagerHome='/u01/app/oracle/fmw/demodomain/nodemanager',
ListenPort='5557',ListenAddress='192.168.33.100')

StartNodeManager

Step 2: Connect to node manager using WLST

Connect WLST offline and type help('nmConnect') to get syntax. Syntax:    nmConnect([username, password], [host], [port], [domainName], [domainDir], [nmType], [verbose])
wls:/offline> nmConnect('weblogic','Welcome1','192.168.33.100','5557','demodomain', nmType='plain')
 Connecting to Node Manager ...
Successfully Connected to Node Manager.
nmConnect
Note :- If your node manager not already started nmConenct result following error.
STEP3: Connect to admin server and Enroll(One time activity)
NM connect result will be successful when admin server is running.

3.a. Connect
wls:/nm/demodomain> connect()
Please enter your username :weblogic
Please enter your password :Welcome1
Please enter your server URL [t3://localhost:7001] :t3://192.168.33.100:7001
t3://192.168.33.100:7001
Connecting to t3://192.168.33.100:7001 with userid weblogic ...
Successfully connected to Admin Server "demoadmin" that belongs to domain "demodomain".
Warning: An insecure protocol was used to connect to the server.
To ensure on-the-wire security, the SSL port or Admin port should be used instead.

3.b. Node Manager Enroll
Syntax : nmEnroll('c:/nmdomain')
wls:/demodomain/serverConfig/> nmEnroll('/u01/app/oracle/fmw/demodomain')
Enrolling this machine with the domain directory at /u01/app/oracle/fmw/demodomain ...Successfully
enrolled this machine with the domain directory at /u01/app/oracle/fmw/demodomain.

Step 4: Start and Stop admin server
Start Syntax: - nmStart('<ADMIN SERVER')
Stop Syntax:- nmKill('<ADMIN SERVER')
wls:/nm/demodomain> nmStart('demoadmin')
Starting server demoadmin ...
Successfully started server demoadmin ...
Terminating the admin server using nmKill() command in WLST
wls:/nm/demodomain> nmKill('demoadmin')
Killing server demoadmin...
Successfully killed server demoadmin..
nmStart and nmStop

Monday, 13 June 2016

Installing a patch in WebLogic 12.2.1


Interim Patch for Bug: 22644507


Platform Patch for : Generic
Product Patched : ORACLE WEBLOGIC SERVER
Product Version      : 12.2.1.0.0

1.Prerequisites

Download the patch from the below link
2. Stop all servers (AdminServer and all Managed server(s)).
 

Patch ex: p22644507_122100_Generic.zip
3.Unzip the patch zip file into the new directory( here i am using patchop name).

unzip –d patchop p22644507_122100_Generic.zip
Set your current directory to the directory where the patch is located.

OPatch Directory
OPatch Directory
 
I have created one new directory (patchop) under $MW_HOME/OPatch

 
4. To check the  list of patches in our environment
./opatch lsinventory


List of patches
To check the List of patches


Here my environment have 6 patches(see above screenshot) and now I am adding one more patch
$MW_HOME/OPatch/patchop/22644507

5.Run OPatch to apply the patch
$opatch apply

OPatch
OPatch Apply
check  the patch is installed or not by using the below command.
[12c@localhost OPatch]$ ./opatch lsinventory

6.Run OPatch to uninstall the patch.
 
$ opatch rollback -id  22644507


deinstall the patch
Rollback the Patch


7. Check the Patch is uninstalled or not by using this command


<
[12c@localhost OPatch]$ ./opatch lsinventory

Friday, 10 June 2016

Installing a patch in WebLogic 12.1.3 using Opatch utility

In the Software Testing Bug Life cycle has an important role. As you know WebLogic is also a software and it is developed in Java. There could be two kinds of bugs:

  • Customer Bugs
  • Internal Bugs
  1. Customer Bugs are raised by the Oracle WebLogic customer who facing issue in their enterprise application.
  2. WebLogic Development team identifies some of the issues then they fall into Internal Bugs
Each bug can be resolved by having a Single Fix. If we have more number of Single Fixes in a version they are collected together every moth and released as Patch Set for a version for example WLS 12.1.3 having a patch  2198345. Over a period of time Oracle creates Patch Set for certain set of bugs. 


Steps to perform Patching on WebLogic 12.1.3

Summary of steps
  1. Download the patch/patchset
  2. Apply the patch using opatch utility
  3. Validate the patch installation

Download the WebLogic patch from MOS

My Oracle Support - MOS 1) You will get the patch or patchset from Oracle support delivery, which you can download only when you are having support ID, that means your company must have customer id from Oracle support.
2) Download the patch from Oracle website (https://support.oracle.com/) as shown below

a) Login to Oracle support with your support ID.
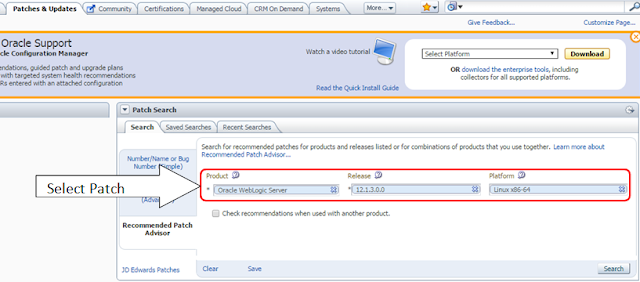
b) Go to Patches and updates, under the patch search section – recommended Patch Advisor
Selecting Patch from Oracle Support site

c) Select the product, Release and the OS version to the environment you wish to install the patch and click search.
Search with patch ID


d) You can directly download the patch by searching patch ID from right top search bar from support as shown below and search.


e) Once you find the patch you are looking for you could download it as shown below.
WebLogic 12c Patch

f) Click on the patch. On the next screen you will find an option to download as shown below
g) Click on the generic.zip as shown below it gets downloaded
Generic patch for download - WebLogic

Applying the WebLogic patch using opatch utility

h) Take this patch.zip to the targeting server and extract it as shown below.

unzip –d PATCH p21983457_121300_Generic.zip

i) The above command extracts the zip into PATCH folder.

j) Shutdown the weblogic Admin and managed servers
k) Once you are done with the shut down backup the middleware home totally.
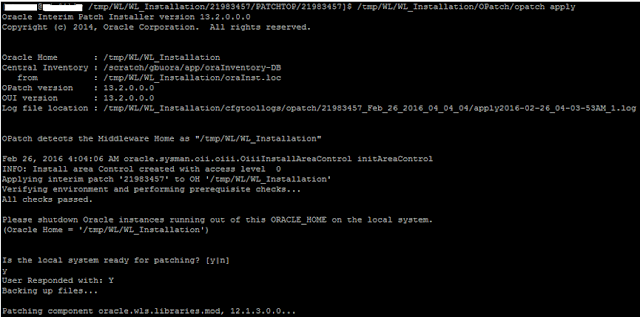
l) Now go to the patch directory and run opatch apply. As shown below.

The above command has to be ran from the patch folder, /u01/app/fmw/WL_Installation/OPatch/opatch is the location where we have the opatch script .
Command -

/u01/app/fmw/WL_Installation/OPatch/opatch apply


m) You will be prompted with Y/N, to check if the environment is ready for patch installation. You can proceed with yes by typing y as shown below.
WebLogic Patching


n) Once you are done with the installation, you will see an output confirming patch installation is successful as shown below.

OPatch succeeded
o) Once you are done you can verify the patch installation as shown below with date and time.
/u01/app/fmw/WL_Installation/OPatch/opatch lsinventory


Rollback of a Patch


1) Make sure that all the weblogic servers are down.
2) Go to the directory(Optional) where you have the opatch, type the below command to roll back.
/u01/app/fmw/WL_Installation/OPatch/opatch rollback -id 21983457


3) Make sure that you have given the correct Patch ID in the rollback command
4) You will be prompted with Y/N, to check if the environment is ready for patch roll back. You can proceed with yes by typing y as shown below.
5) If the rollback is successful you will find the output something as shown below.


Saturday, 16 April 2016

Learn How to setup personal lab for WebLogic 12c Administration

In this page you will be learning the following

  • Download software list for WebLogic Administration course
  • How to prepare my system as Learning Lab?
    • Virtualization with Vagrant setup for WebLogic
    • Learn How to use Vagrant Ubuntu precise 64 box configuration
    • Troubleshooting with Vagrant 5.1.2  for Ubuntu Precise 64
  • How to create groups and users for WebLogic or FMW environments?
Learn How to setup personal lab for WebLogic 12c Administration

Download software list for WebLogic 12c Administration course

  1. Oracle VirtualBox http://download.virtualbox.org/virtualbox
  2. PuTTY http://www.chiark.greenend.org.uk/~sgtatham/putty/download.html
  3. MobaXterm http://mobaxterm.mobatek.net/download-home-edition.html
  4. WinScp (FTP Tool) http://winscp.net/eng/download.php
  5. Oracle JDK http://www.oracle.com/technetwork/java/javase/downloads/jdk8-downloads-2133151.html
  6. Oracle WebLogic http://www.oracle.com/technetwork/middleware/fusion-middleware/downloads/index.html
  7. Notepad++ http://notepad-plus-plus.org/download/v6.7.7.html
  8. Oracle XE Database http://www.oracle.com/technetwork/database/enterprise-edition/downloads/index.html
  9. Oracle SQL Developer http://www.oracle.com/technetwork/developer-tools/sql-developer/overview/index.html
  10. Open LDAP http://www.openldap.org/software/download/
  11. LDAP Browser http://www.ldapadministrator.com/download.htm
  12. Apache HTTP Server http://httpd.apache.org/download.cgi
  13. Open SSL https://www.openssl.org/source/
  14. Thread Logic https://java.net/projects/threadlogic/downloads
  15. Thread dump analyser http://samuraism.jp/samurai/en/index.html.
  16. Ubuntu 14 [optional]  http://www.ubuntu.com/download/desktop
  17. GC Viewer https://github.com/chewiebug/GCViewer/wiki

Vagrant setup for WebLogic

Install Virtual Box - For download and installation instructions visit https://www.virtualbox.org Install Vagrant Install Vagrant - For download and installation instruction visit http://www.vagrantup.com/ Create a directory name it as workspace_wls for the Vagrantfile. In a terminal/command window, navigate to that directory. Before we can kick start your VM, we need to make the follow changes.

All the boxes which are downloaded from the http://www.vagrantbox.es consist of default ssh user as vagrant and root both have password as vagrant. Now let’s tell the Vagrant that we want to use the OS username called "oracle". Add the following to the Vagrantfile before the "config.vm.box" line
vagrant box add {title} {url}
vagrant init {title}
Here you can select any Linux flavor box which are pre-built boxes. Less in size and low consumption of CPU, MEM resources.
  config.ssh.username = "oracle"  
  config.ssh.password = "Welcome1"

Tell Vagrant that we want the VM to boot in GUI mode and that we want it to be allocated 4Gb RAM. Add the following to the Vagrantfile after the "config.vm.box" line

 config.vm.provider :virtualbox do |vb|
    vb.gui = true
    vb.customize ["modifyvm", :id, "--memory", "4096"]
    vb.customize ["modifyvm", :id, "--cpus", "2"]
  end

The Vagrantfile should now look like the following

# -*- mode: ruby -*-
# vi: set ft=ruby :

Vagrant.configure(2) do |config|
  config.ssh.username = "oracle"  
  config.ssh.password = "Welcome1"
  config.vm.box = "oel6u4-64bits.box"
  config.vm.synced_folder "C:/OFMW", "/u01/software",owner: "oracle", group: "oracle",  create: "true"
  config.vm.synced_folder "C:/OFMW/app","/u01/app/oracle", owner: "oracle", group: "oracle", create:true 
  config.vm.network :private_network, ip: "192.168.33.105"
  
  config.vm.provider :virtualbox do |vb|
    vb.gui = true
    vb.customize ["modifyvm", :id, "--memory", "4096"]
    vb.customize ["modifyvm", :id, "--cpus", "2"]
  end
end

in command window you could run the’ vagrant up’ if already running need to update few configurations that changed in the Vagrantfile then use ‘vagrant reload’, this will forceful shutdown the vm and then start the virtualbox.


Ubuntu Precise 32 contains the Vagrantfile as you have many box options select as per you Laptop or desktop capabilities:

# -*- mode: ruby -*-
# vi: set ft=ruby :
Vagrant.configure(2) do |config|
  config.vm.box = "precise32"
  config.vm.box_url="http://files.vagrantup.com/precise32.box"
  config.vm.synced_folder "C:/OFMW","/vagrant_data/", create:true
  config.vm.network :private_network, ip: "192.168.33.104"
  config.vm.provider "virtualbox" do |vb|
    vb.gui = true
    vb.customize ["modifyvm", :id, "--memory", "4092"]
    vb.customize ["modifyvm", :id, "--cpus", "2"]
  end  
  #config.vm.provision :shell, :path => "setup.sh"
 end


Vagrant Ubuntu precise 64 box configuration


Now latest laptops all working with 64 bit only, So for you...
Vagrant.configure(2) do |config|
  config.vm.box = "hashicorp/precise64"
  #config.vm.box_url="http://files.vagrantup.com/precise64.box"
  config.vm.boot_timeout=600
  config.vm.host_name = "mydev.vybhava.com"
  config.vm.network "private_network", ip: "192.168.33.100"

  config.vm.synced_folder "F:/Softwares", "/u01/app/software"
  config.vm.provider "virtualbox" do |vb|
   #vb.gui = true
   vb.memory = "4096"
  end
end

Vagrant boxes are small in sizes and easy to use, flexible, disposable any time you can destroy them. Here some of the vagrant commands that are initially used when you began using it.

vagrant up
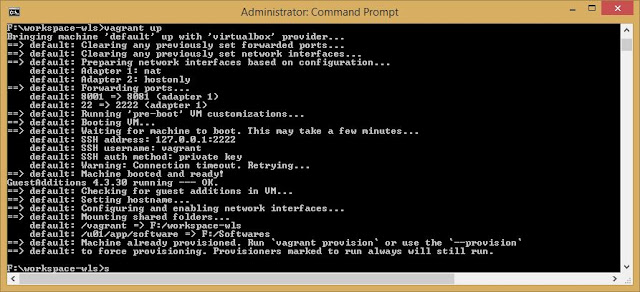

On Windows platform vagrant up runs precise64 box

Login to the vagrant box To work with static IP we need private_network must be working. On Mac OSX.
vagrant ssh
On Windows use PuTTY using 127.0.0.1 and port 2222.
Vagrant ssh connecting precise64 box

Troubleshooting with Vagrant 5.1.2  for Ubuntu Precise64

Switch to root user
sudo -i

Now edit the following in the  /etc/os-release with the below given lines:
vi /etc/os-release
 

NAME="Ubuntu"
VERSION="14.04 LTS, Precise Pangolin"
ID=ubuntu
ID_LIKE=debian
PRETTY_NAME="Ubuntu precise (14.04 LTS)"
VERSION_ID="14.04"

This would resolve your network adapter creation errors on both Mac OSX and also on Windows hosts having guest as precise64 boxes.

Connect Vagrant Ubutnu box with PuTTY


The private network that is configured in the vagrantfile will give the static IP configuration.
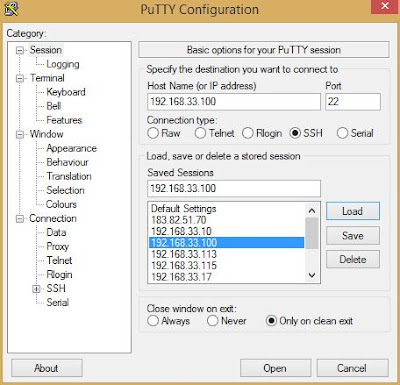
Save the IP for Vagrant Ubuntu box

If you wish to use the same box for the Oracle SOA then you need to increase RAM size and reload the box.

Preferable Load the saved session  PuTTY settings are:
  1. Window -> Line of Scrollback 2000 change to 200000
  2. Appearance -> Font Lucida Sans Typewriter 14/12 point
  3. Colour ->Check Use System colours
  4. Session -> Save
Hope you enjoyed this settings.

How to create groups and users for WebLogic or FMW environments?

Lets create Oracle recommended groups oinstall, dba
groupadd -g 501 oinstall
groupadd -g 502 dba

Now we can go for creating the user name as : oracle. Change the passwd for the user using passwd:
https://github.com/mitchellh/vagrant/issues/6426
useradd -u 502 -g oinstall -G dba oracle
passwd oracle
Create a home directory and give full access and ownership to the standard directory /u01/app/oracle.
mkdir -p /u01/app/oracle

chown -R oracle:oinstall /u01
chmod -R 775 /u01

Finally assign that directory as home director for oracle user.
 usermod -d /u01/app/oracle oracle
Lets make simple script "vi createUser.sh" that you can run as super user that is root user.
#!/bin/bash
# Run this script with root user

echo "Create the new groups and users."

groupadd -g 501 oinstall
groupadd -g 502 dba

useradd -u 502 -g oinstall -G dba -s /bin/bash oracle
passwd oracle

mkdir -p /u01/app/oracle

chown -R oracle:oinstall /u01
chmod -R 775 /u01

usermod -d /u01/app/oracle oracle

echo "User oracle created successfully..."
Now change mode and execute the script:
chmod +x createUser.sh

./createUser.sh 

Friday, 4 March 2016

Heap dump of WebLogic Server using jmap, jhat command utilities

This is extending series of Heap Analysis for WebLogic Server instance. Here is a demonstration of jmap, jhat command utilities usage for collecting heap dump.

jmap --help
Screen shot of jmap help output
jmap command utility help

The jmap live dump

sample jmap live dump
WebLogic server Heap dump
jmap live dump for WebLogic server instance

The jmap command with -histo option

jmap -histo PID

Example execution
jmap histogram generation option
jmap with histo option for a WebLogic server instance

The jhat command utility for analyzing heap dump

 jhat -J-mx1024m demoadmin.bin

This command will launches the web server which will have only the heapdump binary file in readable format. Interestingly you could see the outcome on your browser.


jhat for best heap dump analysis
The jhat command for analysis of Heap dump
 Now the server is listening at 7000 port which is default port which you can also change using -port and value as new port number.

The output of jhat command output on Browser

Note here all the above jmap, jhat, jps commands are executed on JDK1.8 version which don't have perm space.

Monday, 15 February 2016

Generate Heap Dump using java Visual VM


  • A Heap Dump is a snapshot of the Java process heap memory at a given time
  • It is a useful tool to troubleshoot memory leaks and other memory related issues
  • Heap Dump is used to analyse the objects state in a JVM ,usually we analyse Heap Dump during out of memory error
Steps:
  • Go to $JAVA_HOME/bin
  • Run the command ./jvisualvm
    

bin
Invoking Visual VM from the Java Installation

  • After running the command ./jvisualvm command it automatically opens java VisualVM  window

./jvisualvm
Java VisualVM
  • Next open the process id(pid)
weblogic
Open the MBean by selecting  WebLogic Pid
  • Click on Monitor Tab --> Heap Dump Tab
Heap Dump
Click on Heap Dump Tab
  • Click on classes then Java VisualVM enables us to browse Heap Dumps as shown below with the classes view where we can identify the number and percentage of instances referred by each class.

view
Percentage of instances referred by each class


Generate Thread Dumps in WebLogic 12C using WLST & Admin Console

Thread Dump is a snapshot of the state of all Threads That are part of the process.
Thread dumps are one of the very important JVM reports , which we can use to analyse server/JVM hang situations and the root cause of it.

Pre - requisites for this experiment:

  • WebLogic installed
  • Domain Configuration
  • AdminServer,Managed Servers Running state

There are 2 ways to Generate Thread Dumps in WebLogic:

1) From WebLogic Admin Console
2) Using WLST commands


1) ThreadDump from WebLogic Admin Console:
  • Open Servers tab in Admin Console
  • Select Admin/Managed Servers
  • Select Monitoring -> Threads tab
  • Then click on Thread Dump ->Dump Thread Stacks


Thread Dump
Generating Thread Dumps using Admin Console


2) Using WLST commands:

  • Set the CLASS PATH by using Environment variables("java weblogic.WLST") to connect WLST
  • Then it will connect to wls:/offline> 
  • connect("username","password","url:port")
  • Example:  connect("weblogic","welcome1","192.168.136.128:7001")
  • threadDump()
WLST:


WLST
Thread Dump using WLST

Output :  Thread Dump for AdminServer

Output
Thread Dump for WebLogic AdminServer


Friday, 15 January 2016

JMS Distributed Topic

To understand the JMS Concepts in detail we have every concept one experiment that will gives more clarity on each. So here it is about one of the JMS destination type that is 'Distributed Topic'.

Prerequisites
  1. WebLogic installed
  2. Domain configured
  3. JMS Servers configured and module
Current Configurations we will do the following:
  • New/Existing JMS Module - with appropriate subdeployment ( pinned or distributed)
  • Create New Connection Factory
  • Create New Distributed Topic
JMS Topic on WebLogic Server

TopicSend.java


package jms.test;

import java.io.*;
import java.util.*;
import javax.transaction.*;
import javax.naming.*;
import javax.jms.*;
import javax.rmi.PortableRemoteObject;

public class TopicSend
{
 public final static String JNDI_FACTORY="weblogic.jndi.WLInitialContextFactory";
 public final static String JMS_FACTORY="TestCF";
 public final static String TOPIC="TestTopic1";

 protected TopicConnectionFactory tconFactory;
 protected TopicConnection tcon;
 protected TopicSession tsession;
 protected TopicPublisher tpublisher;
 protected Topic topic;
 protected TextMessage msg;

 public void init(Context ctx, String topicName) throws NamingException, JMSException
 {
  tconFactory = (TopicConnectionFactory) PortableRemoteObject.narrow(ctx.lookup(JMS_FACTORY),TopicConnectionFactory.class);
  tcon = tconFactory.createTopicConnection();
  tsession = tcon.createTopicSession(false, Session.AUTO_ACKNOWLEDGE);
  topic = (Topic) PortableRemoteObject.narrow(ctx.lookup(topicName), Topic.class);
  tpublisher = tsession.createPublisher(topic);
  msg = tsession.createTextMessage();
  tcon.start();
 }

 public void send(String message) throws JMSException {
  msg.setText(message);
  tpublisher.publish(msg);
 }

 public void close() throws JMSException {
  tpublisher.close();
  tsession.close();
  tcon.close();
 }

 public static void main(String[] args) throws Exception {
  if (args.length != 1) {
  System.out.println("Usage: java  TopicSend WebLogicURL");
  return;
  }
  InitialContext ic = getInitialContext(args[0]);
  TopicSend ts = new TopicSend();
  ts.init(ic, TOPIC);
  readAndSend(ts);
  ts.close();
 }
 protected static void readAndSend(TopicSend ts)throws IOException, JMSException
 {
  BufferedReader msgStream = new BufferedReader (new InputStreamReader(System.in));
  String line=null;
  System.out.print("\n\t TopicSender Started ... Enter message (\"quit\" to quit): \n");
  do {
  System.out.print("Topic Sender Says > ");
  line = msgStream.readLine();
  if (line != null && line.trim().length() != 0) {
  ts.send(line);
  }
  } while (line != null && ! line.equalsIgnoreCase("quit"));
 }

 protected static InitialContext getInitialContext(String url)
 throws NamingException
 {
  Hashtable env = new Hashtable();
  env.put(Context.INITIAL_CONTEXT_FACTORY, JNDI_FACTORY);
  env.put(Context.PROVIDER_URL, url);
  env.put("weblogic.jndi.createIntermediateContexts", "true");
  return new InitialContext(env);
 }
}


TopicReceive.java


package jms.test;

import java.io.*;
import java.util.*;
import javax.transaction.*;
import javax.naming.*;
import javax.jms.*;
import javax.rmi.PortableRemoteObject;
public class TopicReceive implements MessageListener 
 {
 public final static String JNDI_FACTORY="weblogic.jndi.WLInitialContextFactory";
 public final static String JMS_FACTORY="TestCF";
 public final static String TOPIC="TestTopic1";
 private TopicConnectionFactory tconFactory;
 private TopicConnection tcon;
 private TopicSession tsession;
 private TopicSubscriber tsubscriber;
 private Topic topic;
 private boolean quit = false;

 public void onMessage(Message msg)
{
try {
String msgText;
if (msg instanceof TextMessage) {
msgText = ((TextMessage)msg).getText();
} else {
msgText = msg.toString();
}
System.out.println("JMS Message Received: "+ msgText );
if (msgText.equalsIgnoreCase("quit")) {
synchronized(this) {
quit = true;
this.notifyAll();
}
}
} catch (JMSException jmse) {
System.err.println("An exception occurred: "+jmse.getMessage());
}
}

public void init(Context ctx, String topicName)throws NamingException, JMSException
{
tconFactory = (TopicConnectionFactory)PortableRemoteObject.narrow(ctx.lookup(JMS_FACTORY), TopicConnectionFactory.class);
tcon = tconFactory.createTopicConnection();
tsession = tcon.createTopicSession(false, Session.AUTO_ACKNOWLEDGE);
topic = (Topic) PortableRemoteObject.narrow(ctx.lookup(topicName), Topic.class);
tsubscriber = tsession.createSubscriber(topic);
tsubscriber.setMessageListener(this);
tcon.start();
}

public void close() throws JMSException {
tsubscriber.close();
tsession.close();
tcon.close();
}

public static void main(String[] args) throws Exception {
if (args.length != 1) {
System.out.println("Usage:topic.TopicReceive WebLogicURL");
return;
}
InitialContext ic = getInitialContext(args[0]);
TopicReceive tr = new TopicReceive();
tr.init(ic, TOPIC);
System.out.println("JMS Ready To Receive Messages (To quit, send a \"quit\" message).");
synchronized(tr) {
while (! tr.quit) {
try {
tr.wait();
} catch (InterruptedException ie) {}
}
}
tr.close();
}

private static InitialContext getInitialContext(String url) throws NamingException
{
Hashtable env = new Hashtable();
env.put(Context.INITIAL_CONTEXT_FACTORY, JNDI_FACTORY);
env.put(Context.PROVIDER_URL, url);
env.put("weblogic.jndi.createIntermediateContexts", "true");
return new InitialContext(env);
}
}


Output

Troubleshooting JMS Topic JNDI missing


vagrant@precise64:/vagrant$ java jms.test.TopicSend t3://192.168.33.100:7011,192.168.33.100:7012
Exception in thread "main" javax.naming.NameNotFoundException: Unable to resolve 'TestCF'. Resolved '' [Root exception is javax.naming.NameNotFoundException: Unable to resolve 'TestCF'. Resolved '']; remaining name 'TestCF'
        at weblogic.rjvm.ResponseImpl.unmarshalReturn(ResponseImpl.java:237)
        at weblogic.rmi.cluster.ClusterableRemoteRef.invoke(ClusterableRemoteRef.java:348)
        at weblogic.rmi.cluster.ClusterableRemoteRef.invoke(ClusterableRemoteRef.java:259)
        at weblogic.jndi.internal.ServerNamingNode_1036_WLStub.lookup(Unknown Source)
        at weblogic.jndi.internal.WLContextImpl.lookup(WLContextImpl.java:424)
        at weblogic.jndi.internal.WLContextImpl.lookup(WLContextImpl.java:412)
        at javax.naming.InitialContext.lookup(InitialContext.java:417)
        at jms.test.TopicSend.init(TopicSend.java:25)
        at jms.test.TopicSend.main(TopicSend.java:52)
Caused by: javax.naming.NameNotFoundException: Unable to resolve 'TestCF'. Resolved ''
        at weblogic.jndi.internal.BasicNamingNode.newNameNotFoundException(BasicNamingNode.java:1139)


Fix: Restart entire Weblogic server, if JNDI Tree doesn't show's TestCF


WebLogic Books

  • Oracle WebLogic Server 12c: Administration Handbook
  • WebLogic Diagnostic Framework
  • Advanced WebLogic Server Automation
  • Oracle SOA Suite 11g Administrator's Handbook

Popular Posts