In this page you will be learning the following
- Download software list for WebLogic Administration course
- How to prepare my system as Learning Lab?
- Virtualization with Vagrant setup for WebLogic
- Learn How to use Vagrant Ubuntu precise 64 box configuration
- Troubleshooting with Vagrant 5.1.2 for Ubuntu Precise 64
- How to create groups and users for WebLogic or FMW environments?
 |
| Learn How to setup personal lab for WebLogic 12c Administration |
Download software list for WebLogic 12c Administration course
- Vagrant download http://www.vagrantup.com/downloads.html
- Oracle VirtualBox http://download.virtualbox.org/virtualbox
- PuTTY http://www.chiark.greenend.org.uk/~sgtatham/putty/download.html
- MobaXterm http://mobaxterm.mobatek.net/download-home-edition.html
- WinScp (FTP Tool) http://winscp.net/eng/download.php
- Oracle JDK http://www.oracle.com/technetwork/java/javase/downloads/jdk8-downloads-2133151.html
- Oracle WebLogic http://www.oracle.com/technetwork/middleware/fusion-middleware/downloads/index.html
- Notepad++ http://notepad-plus-plus.org/download/v6.7.7.html
- Oracle XE Database http://www.oracle.com/technetwork/database/enterprise-edition/downloads/index.html
- Oracle SQL Developer http://www.oracle.com/technetwork/developer-tools/sql-developer/overview/index.html
- Open LDAP http://www.openldap.org/software/download/
- LDAP Browser http://www.ldapadministrator.com/download.htm
- Apache HTTP Server http://httpd.apache.org/download.cgi
- Open SSL https://www.openssl.org/source/
- Thread Logic https://java.net/projects/threadlogic/downloads
- Thread dump analyser http://samuraism.jp/samurai/en/index.html.
- Ubuntu 14 [optional] http://www.ubuntu.com/download/desktop
- GC Viewer https://github.com/chewiebug/GCViewer/wiki
Vagrant setup for WebLogic
Install Virtual Box - For download and installation instructions visit https://www.virtualbox.org Install Vagrant Install Vagrant - For download and installation instruction visit http://www.vagrantup.com/ Create a directory name it as workspace_wls for the Vagrantfile. In a terminal/command window, navigate to that directory. Before we can kick start your VM, we need to make the follow changes.All the boxes which are downloaded from the http://www.vagrantbox.es consist of default ssh user as vagrant and root both have password as vagrant. Now let’s tell the Vagrant that we want to use the OS username called "oracle". Add the following to the Vagrantfile before the "config.vm.box" line
vagrant box add {title} {url}
vagrant init {title}
Here you can select any Linux flavor box which are pre-built boxes. Less in size and low consumption of CPU, MEM resources.
  config.ssh.username = "oracle"
  config.ssh.password = "Welcome1"
Tell Vagrant that we want the VM to boot in GUI mode and that we want it to be allocated 4Gb RAM. Add the following to the Vagrantfile after the "config.vm.box" line
 config.vm.provider :virtualbox do |vb|
    vb.gui = true
    vb.customize ["modifyvm", :id, "--memory", "4096"]
    vb.customize ["modifyvm", :id, "--cpus", "2"]
  end
The Vagrantfile should now look like the following
# -*- mode: ruby -*-
# vi: set ft=ruby :

Vagrant.configure(2) do |config|
  config.ssh.username = "oracle"
  config.ssh.password = "Welcome1"
  config.vm.box = "oel6u4-64bits.box"
  config.vm.synced_folder "C:/OFMW", "/u01/software",owner: "oracle", group: "oracle",  create: "true"
  config.vm.synced_folder "C:/OFMW/app","/u01/app/oracle", owner: "oracle", group: "oracle", create:true
  config.vm.network :private_network, ip: "192.168.33.105"

  config.vm.provider :virtualbox do |vb|
    vb.gui = true
    vb.customize ["modifyvm", :id, "--memory", "4096"]
    vb.customize ["modifyvm", :id, "--cpus", "2"]
  end
end
in command window you could run the’ vagrant up’ if already running need to update few configurations that changed in the Vagrantfile then use ‘vagrant reload’, this will forceful shutdown the vm and then start the virtualbox.
Ubuntu Precise 32 contains the Vagrantfile as you have many box options select as per you Laptop or desktop capabilities:
# -*- mode: ruby -*-
# vi: set ft=ruby :
Vagrant.configure(2) do |config|
  config.vm.box = "precise32"
  config.vm.box_url="http://files.vagrantup.com/precise32.box"
  config.vm.synced_folder "C:/OFMW","/vagrant_data/", create:true
  config.vm.network :private_network, ip: "192.168.33.104"
  config.vm.provider "virtualbox" do |vb|
    vb.gui = true
    vb.customize ["modifyvm", :id, "--memory", "4092"]
    vb.customize ["modifyvm", :id, "--cpus", "2"]
  end
  #config.vm.provision :shell, :path => "setup.sh"
 end
Vagrant Ubuntu precise 64 box configuration
Now latest laptops all working with 64 bit only, So for you...
Vagrant.configure(2) do |config|
  config.vm.box = "hashicorp/precise64"
  #config.vm.box_url="http://files.vagrantup.com/precise64.box"
  config.vm.boot_timeout=600
  config.vm.host_name = "mydev.vybhava.com"
  config.vm.network "private_network", ip: "192.168.33.100"

  config.vm.synced_folder "F:/Softwares", "/u01/app/software"
  config.vm.provider "virtualbox" do |vb|
   #vb.gui = true
   vb.memory = "4096"
  end
end
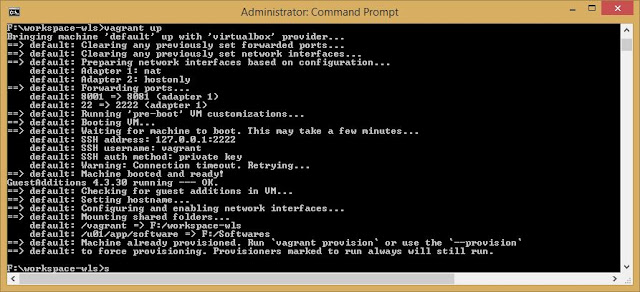
Vagrant boxes are small in sizes and easy to use, flexible, disposable any time you can destroy them. Here some of the vagrant commands that are initially used when you began using it.
vagrant up
 |
| On Windows platform vagrant up runs precise64 box |
Login to the vagrant box To work with static IP we need private_network must be working. On Mac OSX.
vagrant sshOn Windows use PuTTY using 127.0.0.1 and port 2222.
 |
| Vagrant ssh connecting precise64 box |
Troubleshooting with Vagrant 5.1.2 for Ubuntu Precise64
Switch to root usersudo -i
Now edit the following in the /etc/os-release with the below given lines:
vi /etc/os-release
NAME="Ubuntu"
VERSION="14.04 LTS, Precise Pangolin"
ID=ubuntu
ID_LIKE=debian
PRETTY_NAME="Ubuntu precise (14.04 LTS)"
VERSION_ID="14.04"
This would resolve your network adapter creation errors on both Mac OSX and also on Windows hosts having guest as precise64 boxes.
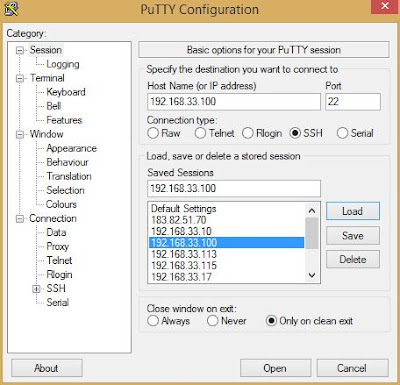
Connect Vagrant Ubutnu box with PuTTY
The private network that is configured in the vagrantfile will give the static IP configuration.
 |
| Save the IP for Vagrant Ubuntu box |
If you wish to use the same box for the Oracle SOA then you need to increase RAM size and reload the box.
Preferable Load the saved session PuTTY settings are:
- Window -> Line of Scrollback 2000 change to 200000
- Appearance -> Font Lucida Sans Typewriter 14/12 point
- Colour ->Check Use System colours
- Session -> Save
How to create groups and users for WebLogic or FMW environments?
Lets create Oracle recommended groups oinstall, dbagroupadd -g 501 oinstall groupadd -g 502 dbaNow we can go for creating the user name as : oracle. Change the passwd for the user using passwd:
https://github.com/mitchellh/vagrant/issues/6426
useradd -u 502 -g oinstall -G dba oracle
passwd oracle
Create a home directory and give full access and ownership to the standard directory /u01/app/oracle.
mkdir -p /u01/app/oracle

chown -R oracle:oinstall /u01
chmod -R 775 /u01
Finally assign that directory as home director for oracle user.
usermod -d /u01/app/oracle oracleLets make simple script "vi createUser.sh" that you can run as super user that is root user.
#!/bin/bash
# Run this script with root user

echo "Create the new groups and users."

groupadd -g 501 oinstall
groupadd -g 502 dba

useradd -u 502 -g oinstall -G dba -s /bin/bash oracle
passwd oracle

mkdir -p /u01/app/oracle

chown -R oracle:oinstall /u01
chmod -R 775 /u01

usermod -d /u01/app/oracle oracle

echo "User oracle created successfully..."
Now change mode and execute the script:
chmod +x createUser.sh

./createUser.sh
